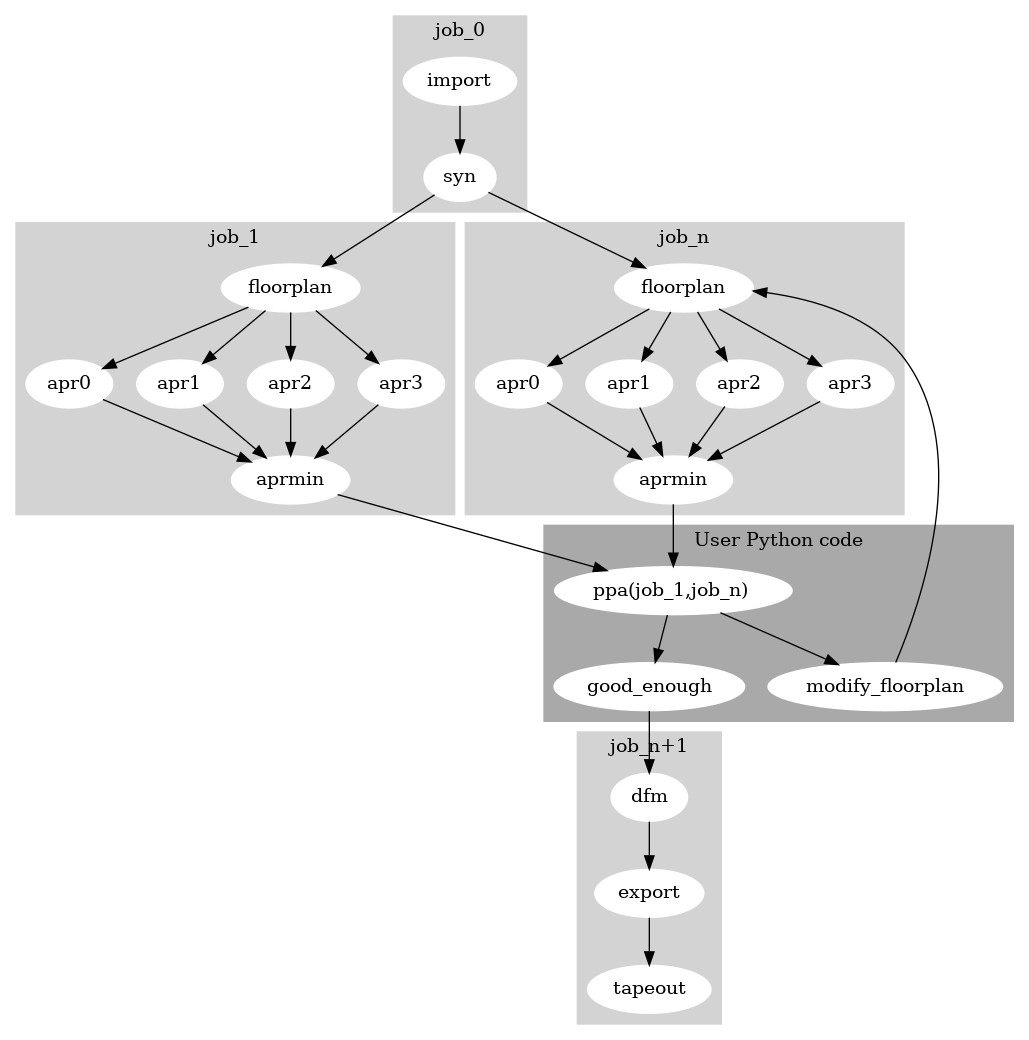
Multi-Job Flows and Automation#

Compilation process describes setting up one job. This tutorial covers what happens when one run() is not enough: chaining a second flow onto the results of the first, sweeping a parameter across many jobs, and building a design hierarchically.

All three rest on the same mechanism – job history – so it is worth understanding that first.

Job History#

Every Project.run() copies the finished project state into a history record keyed by [option,jobname], and Project.history() reads it back:

project.option.set_jobname("baseline")
project.run()

# Change something, or the second run just reproduces the first.
project.option.set_optmode(3)             # optimize harder
project.option.set_jobname("tuned")
project.run()

before = project.history("baseline").get("metric", "cellarea",
                                         step="synthesis", index="0")
after = project.history("tuned").get("metric", "cellarea",
                                     step="synthesis", index="0")

Three properties of the record are worth knowing, because they decide how you structure a script:

  • Keyed by jobname. Give each run a distinct name or you cannot tell the results apart. Reusing one replaces the earlier record and logs Overwriting job <name>.

  • Recorded even when the run fails. The history is written in a finally block, so a job that errored is still queryable – which is what makes it usable for automation that has to cope with failures.

  • A full project, not just metrics. history() returns a Project, so anything readable on a live project is readable on a past one.

Pattern 1: Chaining Flows#

Run one flow, then feed its outputs into another as inputs. The canonical case is implementation followed by signoff, because they are different flows over the same design.

// Pattern 1: chaining flows. One job's outputs become the next job's inputs, // located with find_result() and carried across in a new fileset. // Rendered at build time by sphinx.ext.graphviz; do not commit an image. digraph chaining { rankdir=LR; node [shape=box, style=filled, color=white, fontname="Helvetica"]; graph [fontname="Helvetica"]; subgraph cluster_a { style=filled; color=lightgrey; label="job: rtl2gds (asicflow)"; syn [label="synthesis"]; route [label="route.detailed"]; wr [label="write.gds"]; syn -> route -> wr; } handoff [label="your code\lfind_result(\"gds\", …)\ladd_fileset(\"layout\")\lset_jobname(\"signoff\")\l", shape=note, style=filled, fillcolor="#fff3c4", color="#b8860b"]; subgraph cluster_b { style=filled; color=lightgrey; label="job: signoff (SignoffFlow)"; drc; lvs; drc -> lvs; } wr -> handoff [label=" gds, vg"]; handoff -> drc; }

Project.find_result() locates an output by extension and step, which is what lets the second job pick up where the first left off:


# After the first run, we find the paths to the output GDSII and netlist files...
# ...and add them to a new 'layout' fileset. These files will be the
# *inputs* for our next signoff step.
with design.active_fileset("layout"):
    design.set_topmodule("gcd")
    design.add_file(project.find_result('gds', step='write.gds'))
    design.add_file(project.find_result('vg', step='write.views'))

# Add the new 'layout' fileset to the project for the next run.
# `clobber=True` ensures it overwrites the fileset if it already exists.
project.add_fileset("layout", clobber=True)

# Explicitly switch the project's flow to `SignoffFlow`, a pre-built flow
# designed for running DRC and LVS checks on a layout.
project.set_flow(SignoffFlow())

# Set a unique name for this job run.
project.option.set_jobname("signoff")

# Execute the signoff flow.
project.run()

Note the three moving parts: a new fileset holding the previous job’s outputs, clobber=True so it replaces rather than appends on a re-run, and a new jobname so the signoff results do not overwrite the implementation record.

Full example: examples/gcd/gcd_skywater.py.

Pattern 2: Sweeping a Parameter#

Run the same flow many times with one thing changed, then compare.

// Pattern 2: sweeping a parameter. The same flow runs once per variant, each // under its own jobname, and the results are read back out of history(). // Rendered at build time by sphinx.ext.graphviz; do not commit an image. digraph sweep { rankdir=LR; node [shape=box, style=filled, color=white, fontname="Helvetica"]; graph [fontname="Helvetica"]; design [label="one Design\lrtl.8 rtl.16\lrtl.32 rtl.64\l", shape=folder, style=filled, fillcolor=white]; subgraph cluster_8 { style=filled; color=lightgrey; label="job: N8"; j8 [label="synthesis"]; } subgraph cluster_16 { style=filled; color=lightgrey; label="job: N16"; j16 [label="synthesis"]; } subgraph cluster_32 { style=filled; color=lightgrey; label="job: N32"; j32 [label="synthesis"]; } subgraph cluster_64 { style=filled; color=lightgrey; label="job: N64"; j64 [label="synthesis"]; } compare [label="your code\lhistory(\"N8\").get(\"metric\", \"cellarea\", …)\l… compare, plot, choose\l", shape=note, style=filled, fillcolor="#fff3c4", color="#b8860b"]; design -> j8; design -> j16; design -> j32; design -> j64; j8 -> compare; j16 -> compare; j32 -> compare; j64 -> compare; }

Carry each variant as its own fileset and give each run its own jobname:

for n in datawidths:
    # Add the corresponding RTL fileset to the project for this run.
    # 'clobber=True' ensures we replace the fileset from the previous iteration.
    proj.add_fileset(f"rtl.{n}", clobber=True)
    # Set a unique jobname for each run. This helps in organizing the results
    # and retrieving metrics from the correct run later.
    proj.option.set_jobname(f"N{n}")

    # Execute the synthesis flow.
    proj.run()

    # After the run, retrieve the 'cellarea' metric from the 'synthesis' step.
    # We use the jobname to access the history of the specific run we just completed.
    area.append(proj.history(f"N{n}").get('metric', 'cellarea', step='synthesis', index='0'))

The loop body is the whole pattern: swap the fileset, name the job, run, read the metric back out of history.

Full example: examples/oh_experiments/adder_sweep.py. check_area.py in the same directory is the variant that builds a fresh project per run instead of reusing one – worth preferring when the runs differ in more than one setting, since it removes any chance of state leaking between them.

See also

Sweeps are also the natural place to add parallelism: the jobs are independent, so they can run at the same time. Parallel Job Execution covers how.

Pattern 3: Hierarchical Builds#

Build a block in one job, then consume its results in another. This is the multi-job structure behind hardened macros: the child is implemented, packaged as a library, and injected into the parent, which never sees its RTL.

// Pattern 3: hierarchical builds. A child is implemented in its own job and // consumed by the parent as a library, never as RTL. // Rendered at build time by sphinx.ext.graphviz; do not commit an image. digraph hierarchical { rankdir=LR; node [shape=box, style=filled, color=white, fontname="Helvetica"]; graph [fontname="Helvetica"]; subgraph cluster_child { style=filled; color=lightgrey; label="job 1: implement the child"; cs [label="synthesis"]; cr [label="route.detailed"]; cw [label="write.views"]; cs -> cr -> cw; } pack [label="your code\lStdCellLibrary(\"mymacro\")\l + LEF / GDS / LIB\l", shape=note, style=filled, fillcolor="#fff3c4", color="#b8860b"]; subgraph cluster_parent { style=filled; color=lightgrey; label="job 2: implement the parent"; ps [label="synthesis\l(child blackboxed)\l"]; pp [label="place.global"]; pr [label="route.detailed"]; ps -> pp -> pr; } cw -> pack [label=" lef, gds, lib"]; pack -> ps [label=" add_alias\l add_asiclib\l"]; }

library = build_and()          # job 1: implement the child, package the views

project = ASIC(Top())
project.add_alias(And(), "rtl", None, None)   # blackbox the child's RTL
project.add_asiclib(library)                  # inject its LEF/LIB
project.run()                                 # job 2: implement the parent

Instantiating a hardened module works this through end to end, and Hardening parameterized modules automates it across every parameterization of a module.

Putting It Together#

The three patterns compose into flows that no single flowgraph can express, because the decisions between jobs are ordinary Python:

// Putting the three patterns together. The point of the picture is the // alternation: SiliconCompiler runs a job (grey), your script reads the result // and decides what to run next (yellow note), repeat. // Rendered at build time by sphinx.ext.graphviz; do not commit an image. digraph together { rankdir=TB; compound=true; node [shape=box, style=filled, color=white, fontname="Helvetica"]; graph [fontname="Helvetica"]; edge [fontname="Helvetica", fontsize=10]; // ---- step 1: one synthesis job ---------------------------------------- subgraph cluster_syn { style=filled; color=lightgrey; label="1. job: syn"; elaborate -> synthesis; } // ---- step 2: your code fans the sweep out ------------------------------ fanout [label="2. your code\lfor cfg in configs:\l set_jobname(cfg); run()\l", shape=note, style=filled, fillcolor="#fff3c4", color="#b8860b"]; // ---- step 3: one implementation job per configuration ------------------ subgraph cluster_impl_a { style=filled; color=lightgrey; label="3. job: impl_a"; fa [label="floorplan.init"]; pa [label="place.global"]; ra [label="route.detailed"]; fa -> pa -> ra; } subgraph cluster_impl_n { style=filled; color=lightgrey; label="3. job: impl_n"; fn [label="floorplan.init"]; pn [label="place.global"]; rn [label="route.detailed"]; fn -> pn -> rn; } // ---- step 4: your code compares and decides ---------------------------- decide [label="4. your code\lhistory(\"impl_a\") vs history(\"impl_n\")\lgood enough?\l", shape=note, style=filled, fillcolor="#fff3c4", color="#b8860b"]; // ---- step 5: signoff --------------------------------------------------- subgraph cluster_signoff { style=filled; color=lightgrey; label="5. job: signoff"; drc -> lvs; } synthesis -> fanout; fanout -> fa; fanout -> fn; ra -> decide; rn -> decide; decide -> drc [label=" yes"]; decide -> fanout [label=" no: adjust and re-run", style=dashed, constraint=false]; }

Read it as an alternation. SiliconCompiler runs a job (grey); your script reads the result and decides what to run next (yellow); repeat. A synthesis job fans out into one implementation job per configuration, your code compares them, and either proceeds to signoff or adjusts and re-runs.

The flowgraph handles what is static – the steps inside a job, and the edges between them. Your script handles what depends on a result, because that is not something a static graph can express.

See also