Installation#
Installing Python#
Before installing the SiliconCompiler package you will need to set up a Python environment. The following sections will walk you through how to install the appropriate python dependencies and start a [Python virtual environment](https://docs.python.org/3/library/venv.html). Note that at any time, if you need to exit the Python virtual environment, type ‘deactivate’ and hit enter.
Ubuntu (>=18.04)#
Open up a terminal and enter the following command sequence.
python3 --version                                      # check for Python 3
sudo apt update                                        # update package information
sudo apt install python3-dev python3-pip python3-venv  # install dependencies
python3 -m venv  ./venv                                # create a virtual env
source ./venv/bin/activate                             # active virtual env (bash/zsh)
Note
If you plan to generate any docs or create any flowgraphs, you’ll also need to install Graphviz.
You can make sure you have this dependency by running sudo apt install graphviz xdot.
Skip ahead to SC Install.
RHEL (>=RHEL 7)#
Open up a terminal and enter the following command sequence.
sudo subscription-manager repos --enable rhel-server-rhscl-7-rpms  # enable Red Hat Software Collections repository
sudo yum -y install rh-python38                                    # install Python 3.8
scl enable rh-python38 bash                                        # enable Python in current environment
python3 --version                                                  # check for Python 3
python3 -m venv ./venv                                             # create a virtual env
source ./venv/bin/activate                                         # active virtual env (bash/zsh)
Note
If you plan to generate any docs or create any flowgraphs, you’ll also need to install Graphviz.
You can make sure you have this dependency by running sudo yum install graphviz xdot
Skip ahead to SC Install.
macOS (>=10.15)#
Open up a terminal and enter the following command sequence.
/bin/bash -c "$(curl -fsSL https://raw.githubusercontent.com/Homebrew/install/HEAD/install.sh)"
export PATH="/usr/local/opt/python/libexec/bin:$PATH"
brew update
brew install python
python3 --version                                      # check for Python 3
python3 -m venv  ./venv                                # create a virtual env
source ./venv/bin/activate                             # active virtual env
Note
If you plan to generate any docs or create any flowgraphs, you’ll also need to install Graphviz.
You can make sure you have this dependency by running brew install graphviz xdot
Skip ahead to SC Install.
Windows (>= Windows 10)#
Install the latest Python package from Python.org using the Windows installer. Open up a Windows shell by:
Pressing the ‘Windows’ key
Typing ‘cmd’, and pressing enter.
From the command shell, enter the following sequence to create and activate a virtual environment.
python3 -m venv  .\venv
.\venv\Scripts\activate
Note
If you plan to generate any docs or create any flowgraphs, you’ll also need to install Graphviz.
Installing SiliconCompiler#
After you’ve got the python dependencies installed, you will need to install SiliconCompiler. There are a few different ways to do this:
The recommended method is to install the last stable version published to pypi.org, or
You can install directly from the git repository (best for developers).
Install from pypi.org#
SiliconCompiler can be installed directly from pypi.org using pip. Activate your Python Virtual Environment and follow the instructions below.
(venv) pip install --upgrade siliconcompiler    # install SiliconCompiler in venv
(venv) pip show siliconcompiler                 # will display SiliconCompiler package information
To confirm your installation:
(venv) python3 -c "import siliconcompiler;print(siliconcompiler.__version__)"
The expected version should be printed to the display:
0.38.1
Skip to asic demo.
Install from GitHub Repo (Linux/MacOS)#
You can also install SiliconCompiler from the latest SiliconCompiler GitHub Repository.
Install SiliconCompiler
Finally, to clone and install SiliconCompiler, run the following:
(venv) git clone -b v0.38.1 siliconcompiler/siliconcompiler
(venv) cd siliconcompiler
(venv) pip install --upgrade pip
(venv) pip install -e .
To confirm your installation:
(venv) python3 -c "import siliconcompiler;print(siliconcompiler.__version__)"
The expected version should be printed to the display:
0.38.1
ASIC Demo#
Now that you have installed SiliconCompiler, you can test your installation by running a quick demo through the ASIC design flow in the cloud.
python3 -m siliconcompiler.demos.asic_demo -remote
Your remote job should only take a few minutes to run if the servers aren’t too busy.
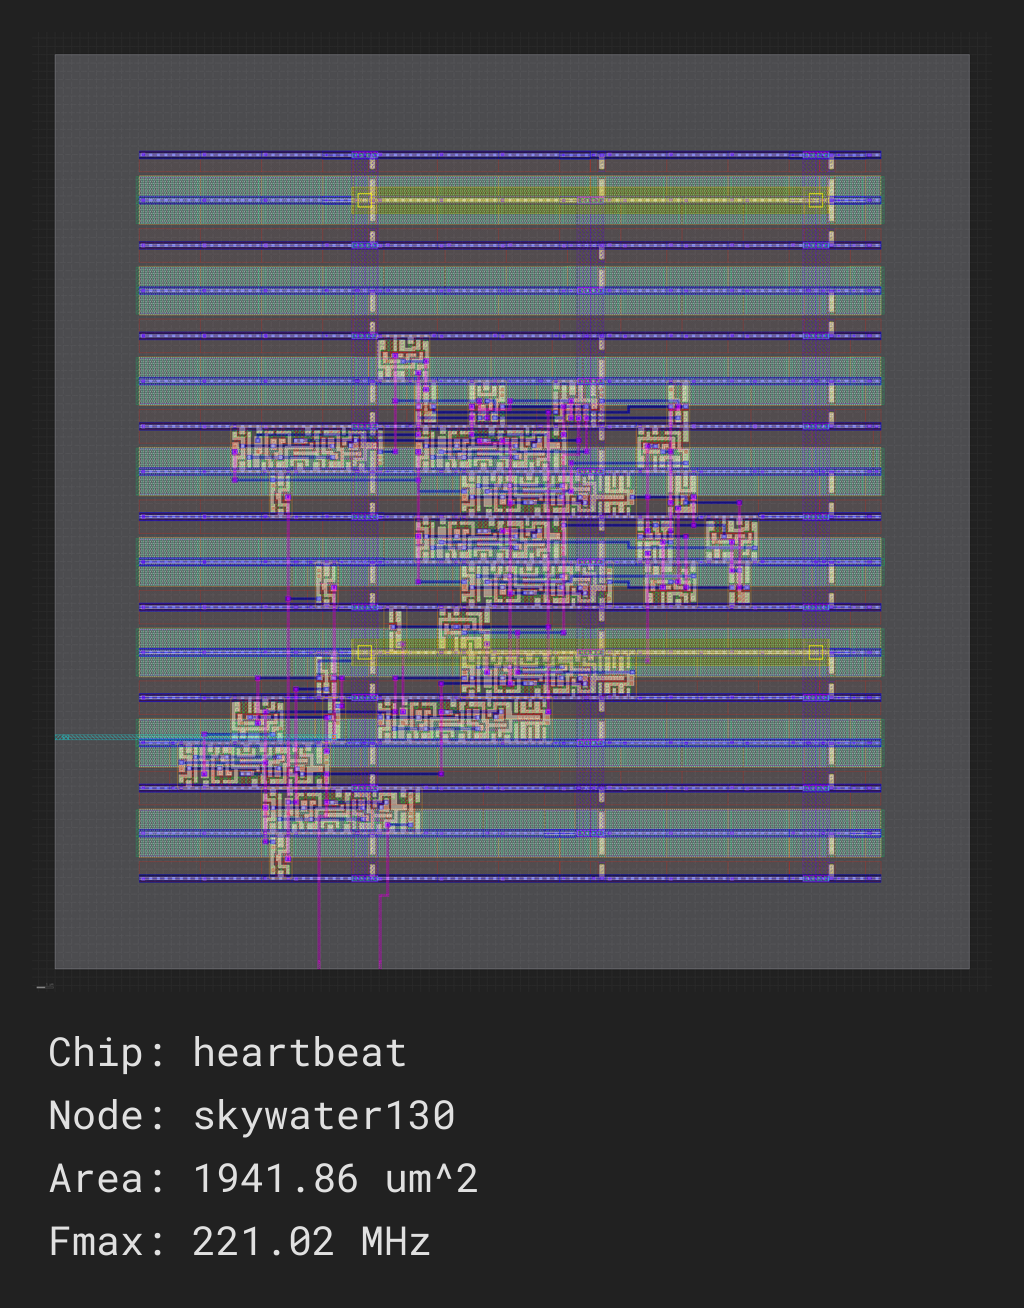
It should end with a results directory where you can find png file which displays your results.
It should look something like this:
See Quickstart guide next to go through the design and run details of the quick demo above.
External Tools#
If you wish to run on your machine instead of remotely in the cloud as in the quick asic demo target above, there will be some tools you need to install first. You can use the provided sc-install application to install the tools or view the scripts directly in the list below.
Note
To install the recommended tools for an asic flow, use: sc-install -group asic or for an fpga flow sc-install -group fpga.
To see a full list of supported groups see sc-install.
Links to individual tool installation instructions and platform limitations can be found in the pre-defined tool drivers.
We have provided the following helper install scripts for this minimum toolset for the ASIC flow as well as other external tools, but keep in mind that they are for reference only. If you should run into issues, please consult the official download instructions for the tool itself. All official tool documentation links can be found in the pre-defined tool drivers section.
| tool | rhel8 | rhel9 | ubuntu20 | ubuntu22 | ubuntu24 | ubuntu26 |
slurm |
||||||
vcd2fst |
||||||
verible |
||||||
wildebeest |
||||||
yosys-moosic |
||||||
yosys-slang |
See Quickstart guide next to see how to run locally on your machine with these tools.